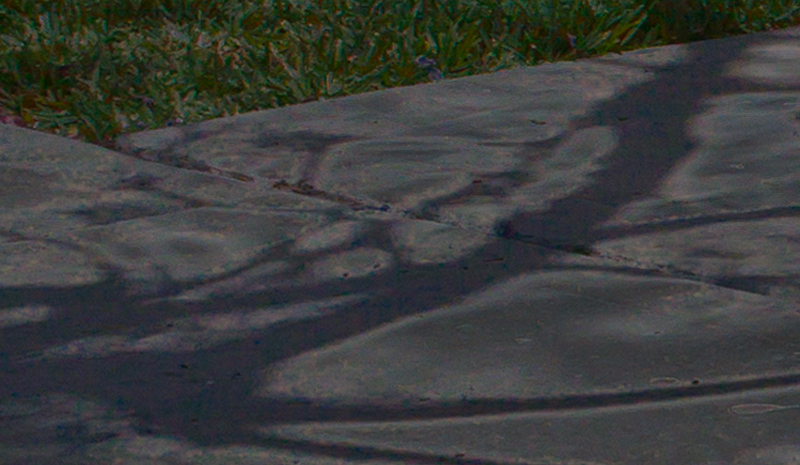
This image is currently hanging in the Escondido Municipal Arts Gallery as part of the PAG show, “Shadows”. The show runs through February 5th, 2011. “Sidewalk Salvation” is one of the first successful images I created using an experimental process I call HDRHDR is short for High Dynamic Range. HDR (High Dynamic Range) Photography refers to capturing an ent... More compositing. As I explore this technique my workflow will no doubt evolve, but at this moment in time I want to document and share what I have discovered so far.

The idea to create HDR composites came completely by accident when I added a mismatched image to Photomatix Pro. The resulting image was surprisingly cool but completely accidental.

I tried this mismatched processing a couple dozen more times for some not so successful images. It took some time and a lot of failed attempts before I came up with the following workflow.
Original HDR Frames
I start with a three bracketed scene.


These bracketed images were shot hand held in down town San Diego. I took these when I was just starting to explore HDR. I wasn’t equipped with a tri-pod.
I loved this scene when I shot it, but was less enthused after seeing it on my big monitor. I couldn’t figure out what was wrong. At some point I realized the skewed vertical lines were causing part of the problem, but straightening them didn’t make me love the picture. I didn’t give up on it though.
Mismatched Frame
I chose the valley picture because I liked the contrast between city and country settingsAn application's behaviors and preferences are controlled with settings. More. I also thought the sky blueBlue is the third of three primary colors in an additive color model. The "B" in RGB. More and clouds would interact nicely with the mostly grey sidewalk.
Pre aligning the images in Photoshop allows me some control over the composition. I can get a good idea of how the composited scenes will align with each other, and what the overall composition might look like.

Align the HDR Fames
HDR processing software has image alignment built in, but I quickly discovered that this doesn’t work with composites. The fourth mismatched image throws everything off and makes it impossible for the software to align the first three images. My work around is to stack everything in Photoshop layers and pre-align them there.
I start with a 16 bitA bit is the smallest unit of information in a computer. More, layered Photoshop file that includes the three original HDR frames. I use Auto-Align Layers on the auto setting to align the three layers. Auto-align will get things close but not always perfect. I set my layerAll objects have a stacking order, like a stack of paper. When the layer (paper) is opaque it covers... More mode temporarily to “difference” to check alignment, adjusting the layer position until there are no white edges.

The white halo shows that these layers are not aligned.
Align the layers until the image is as dark as you can get it. These layers are aligned.
If the HDR brackets were shot with a tripod they would already be aligned when layered in Photoshop. Still it’s a good idea to double check with the “difference” layer mode.
Once the layers are aligned I select all three layers and transform, scale and cropCrop is used to change the size and dimensions of the canvas. Photoshop's crop tool can be used to d... More as needed. This is when I straightened the vertical walls in the sidewalk image.
Save Individual Tiffs
I name the layers 1, 2, 3 and 4 and run an actionActions automate tasks for Photoshop files. An action is a user-built series of recorded tasks or c... More that saves each layer out to it’s own individual 16 bit tiffTIFF stands for Tag Image File Format. TIFF is a file format that can contain raster and vector grap... More file.
Photomatix Pro
The four tiffs are loaded into Photomatix Pro as the bracketed images. An exposure settings window appears because the fourth image does not fit into the exposure bracketed values of the first three images. I change the exposure value for each image depending on the lightness values.
Align Source Image must be turned off. This ensures the first three images stay aligned. The automatic and semi manual deghosting feature is not necessary for this composite.
The tonemapping process is identical to any other HDR image. I play with the sliders until I get what I like.
Final Retouching
Final retouching, sharpening and color corrections are done back in Photoshop.