
There’s No Place Like Home for the Holidays.
Merry Christmas from our Home to yours.
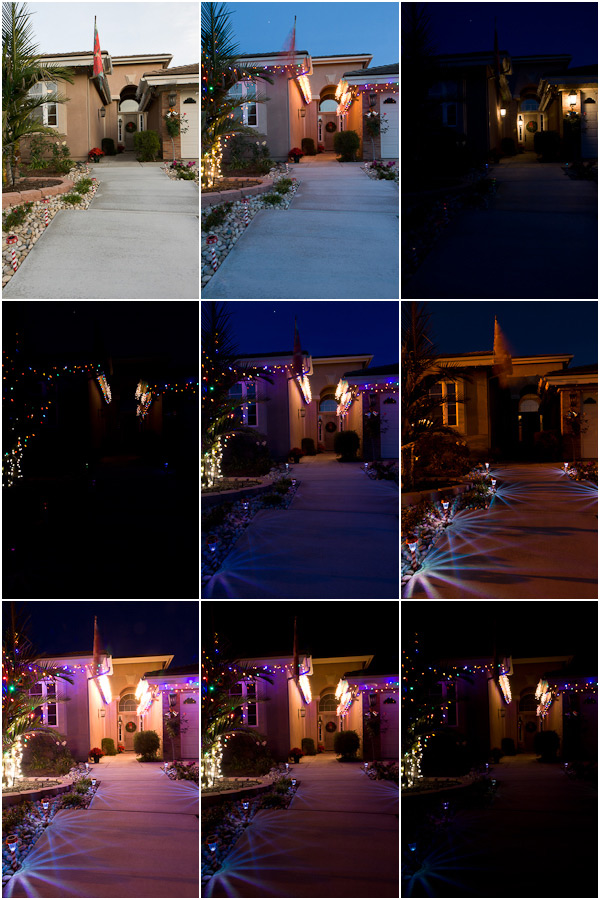
The Chrismtas image of our home was digitally painted from a series of photographs taken over a two-hour period of time. I set up my camera about half an hour before sunset, while there was still plenty of daylight to compose and focus my image. Once my camera was set in place, I only touched it to change the shutter speed for exposure.
CAPTURING THE PHOTOGRAPHIC CONTENT
Daylight to Night Light
I captured a full range of exposures from daylight to night light. At times I bracketed the shot by capturing three exposures at one time, normal exposure, +2 over, and -2 under. Other times I manually adjusted the exposure to capture either the detail of the lights or the detail of the shadows.
Here is a sampling of these images.
Light Painting
After sunset, I turned off all the lights and captured some light-painted images using a flashlight. I painted light on the poinsettias, wreath and bells, each in a separate exposure.
These are the light painted images.

Interior Lighting
Next, I lit the interior of our home with a studio strobe. I turned off all the exterior lights and had my husband flash the strobe through the windows while I opened the camera shutter. This created a bright interior glow that would help give the final image a warm, inviting feeling.
These are the window images

The Sky
The first set of images were taken on a perfectly still evening, without the slightest breeze. This meant nothing moved, not even a frond on the palm tree. These are perfect conditions for stacking or exposure blending in Photoshop, because each image registers perfectly with the previous one.
The downside was there was not even a hint of setting sun color in the sky. I hoped that sunrise the next day might offer an exciting sky. I marked the sidewalk where my tripod sat and carried my camera in without adjusting the tripod legs or the camera lens focal length. The next morning I got up before sunrise and set my camera back in the same spot on the sidewalk. Unfortunately the next day sunrise was just as boring as the preceding sunset, so I returned with my camera that evening and captured this.

With a little editing I pulled out enough color to make it interesting.
DIGITAL EDITING
HDRHDR is short for High Dynamic Range. HDR (High Dynamic Range) Photography refers to capturing an ent... More Starting CanvasCanvas is the entire work area of a document. Think of it as the top of your office desk. More
I began with Photomatix Pro to create an HDR image of these three brackets.

The blended HDR image served as my starting point. It was like having a sketched canvas to paint on.

I spent the next three evenings, about six hours total, painting the image in Photoshop with pieces of content from all of the photographs I had captured. I worked in small areas at a time, selectively building up the light and contrast.
Selective Content Blending
The basic blending process is to open a photo containing some light detail that can be used to enhance the starting canvas. The detail photo is duplicated to a layerAll objects have a stacking order, like a stack of paper. When the layer (paper) is opaque it covers... More on top of the working canvas. A blackBlack is the fourth color in the process of four-color printing. The "K" in CMYK. Black adds tonal d... More mask is added to completely block out the new layer content. The black mask is then painted with a soft white brushWhat is (Digital) Brush? A brush, found in digital painting applications such as Photoshop, Painter,... More, selectively revealing the new details.

This image shows the light painted wreath and door image selectively painted into the HDR starting cavas.
Blend Modes
I used layer blend modes to create different kinds of effects. Most often I used the “Lighter Color” blend modeBlend Modes control how colors interact with each other. Blend Modes can be applied to layers and br... More, which selectively adds only the lighter pixels from the new layer. I used the “Soft Light” blend mode when I wanted to add both light and contrast. Sometimes I used a percentage of the new content by adjusting the layer opacityOpacity is the density of a pixel. Any amount less than 100% will have some transparency. Opacity se... More.
When the new content created the effect I wanted, I merged the layers together and moved on to another area of the picture.
I cannot create a step-by-step accounting of how the image developed. Imagine asking a painter to explain every brush stroke More, and paint color used to create an oil painting. The process of creating a digital painting is exactly the same.
Final Thoughts
I set out to create a warm, inviting picture of our home, decorated to celebrate the Holidays. The mood was clear in my mind, but I didn’t have a clear picture of what the final image would look like. Sometimes my feelings can be more real than what I see, and especially more real than what the camera sees. This image is a perfect example of the mood being different than what a camera can capture in a single exposure.
I hope your own home is warm and inviting for the Holidays and constantly filled with people you love.