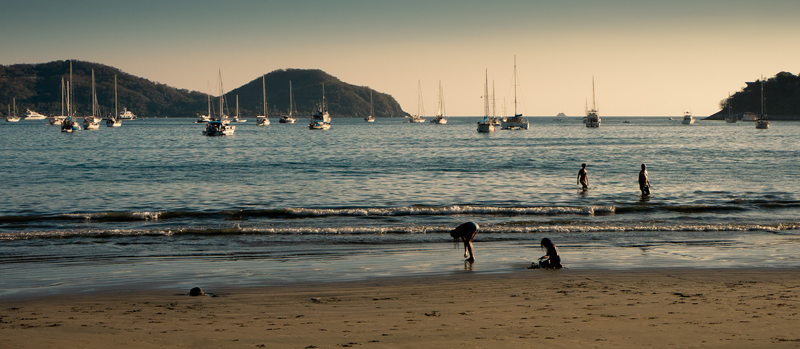
I shot this image while on vacation in Mexico. It was late in the day, but not as late as the final edited image suggests.
I really blew the exposure and initially rejected it for being so poor.

This is the unedited version.
I like the mood created from the setting sun. I also like the kids playing in the sand with the older tourists wading in the water behind them. This picture really captures the spirit of Zihuatanejo Mexico. I was disappointed in myself for not getting the exposure right.
Fortunately, I shoot everything in the Raw image format. Sometimes under exposed raw images can be lightened and shadows recovered, but not for this image.

The exposure is so bad that there is no chance of pulling details out of these shadows.
Instead of fighting what I couldn’t fix, I decided to work with what is there and what I like about the image to begin with.
All of the edits were done in Adobe Camera Raw. The exact same edits can be done with Adobe Lightroom. That means you don’t have to own Photoshop to create an image like this. Amazon is listing Lightroom for under $250. Photoshop retails for $665.00. If you are new to digital image editing, consider buying Lightroom before you invest in Photoshop.
Camera Raw Editing
First, cropCrop is used to change the size and dimensions of the canvas. Photoshop's crop tool can be used to d... More and straighten the image. The straighten tool will do both.

This is the straighten tool in Adobe Camera Raw.

Drag the straighten tool along the horizon line. Next, pull the top and bottom crop handles in to get the panoramic crop. I often give my images a panoramic crop because I think of wide screen panoramas as telling a story. This image definitely tells a story, so it is perfect for the wide screen crop.
Screen Grab SettingsAn application's behaviors and preferences are controlled with settings. More

Overall I brightened the image slightly, but I also cranked up the blacks. Instead of fighting the shadows I accentuated them. I sharpened it a little more than normal. Sharpening helps pop the highlights in a dark contrasty image like this.

These three HSL edits have the net effect of warming up the image and accentuating the gold tones.

Split toning is a great and probably underused color editing tool. The setting shown above gives a golden warm color to all the highlights, replacing any nuetral white with the goldish color.
Finally, I apply a slight post crop vignetteVignette describes a unique form for a frame around the edges of an image. More, darkening the edges of the image.
Conclusion
Set your camera to capture in the Raw Image Format. Leave it there. Buy more scan cards if you need to.
Have fun with raw editing, whether it be with ACR or Lightroom. Push the sliders to the extremes and see what happens. Remember, you can NOT damage your image. Pixels can’t be lost or damaged while working in raw because they don’t exist yet. The pixels are generated when the image is opened in Photoshop.
Go back to some of your reject images and see what you can make from them.