
Step 1
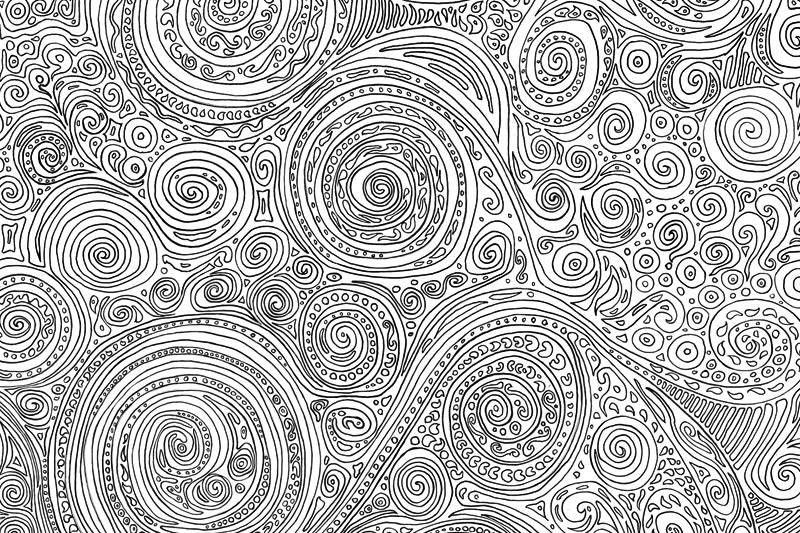
Draw a cool pattern. I drew mine the old fashioned way – with pencil and paper. The finished drawing was then scanned so I could color it in Photoshop.
Step 2
Open the scanned illustration in Photoshop and double click on the layerAll objects have a stacking order, like a stack of paper. When the layer (paper) is opaque it covers... More to change it from a flattened “background” layer to a floating layer. Set the layer blend style to multiply. Add a new layer below the illustration and start painting in the colors.

Flatten the completed painted pattern and save the file to be used with your portrait picture.

Step 3
Photograph your subject. Have your subject wear white and place them in front of a white backdrop.
Step 4
Create a displacement map file. This file will be used to warp the illustration to the shapes in your portrait. In effect it will model the illustration to the wrinkles in the blouse.
Convert your portrait to GrayscaleA grayscale image has no color hues but contains a range of gray levels between pure black or white.... More, Image>Mode>Grayscale. Blur the image, Filter>Blur>Gaussian BlurGaussian blur is a filter effect used to soften images. Named after French Mathematician Carl Friedr... More. The amount of blur will depend on the resolutionImage resolution measures the number of pixels in an image as it is displayed or printed. Pixels Per... More of your file. Follow the sample image below as a guide.
Now press Command-L (PC:Ctrl-L) to bring up the Levels dialog box. Adjust the levels for contrast. More contrast will give you more displacement.

Step 5
Save the displacement map file as a new .psd. Name the file “Portrait-Displacment.psd” and save it in a place where you can easily find it later. You will use this file multiple times to create your finished portrait.

Step 6
Open the portrait image and your illustration image. Drag the illustration image into the portrait file. Save a layered working .psd file. You can title it something like “Trippy-Portait-tutorial.psd”
Step 7
Now the creative fun begins. CropCrop is used to change the size and dimensions of the canvas. Photoshop's crop tool can be used to d... More a portion of the illustration pattern for use on the blouse. Make sure that the crop portion fills the whole area and then some. Use the marque tool to select a piece of the pattern. Press Command-C (PC:Cntrl-C) to copy the selectionA selection protects non selected areas so that they can't be edited. More. Press Command-V (PC:Cntrl-V) to paste into a new layer. Move the layer until it positions nicely over the blouse.

Make sure the new crop layer is selected. Go to menu Filter>Distort>Displace. Use the default settingsAn application's behaviors and preferences are controlled with settings. More to start. If you are unhappy with the settings you can adjust the Horizontal and Vertical scale. Larger numbers will displace more for deeper creavices and wrinkles, smaller numbers less. Clicking “okay” brings up a navigation window to find your displacement map file. Choose the psdPSD is short for Photoshop document. A Photoshop document saved to a local hard drive has the extens... More file created in Step 5 and click “open” to apply the filterA filter is a digital effect used to modify image pixels and selections. Algorithms control modifica... More.
Step 8
Add a mask to the pattern crop layer for the blouse. It’s important that you apply the displace filter before you apply the layer maskLayer masks are used to non-destructively hide or reveal the contents of a layer. More will screw up the displace filter.

Step 9
Take a close look at the blouse. Think like a seamstress. How many pieces of fabric did it take to sew this blouse? It has front panels, sleeves, cuffs, collars and button hole hems. Simply adding the pattern in a single piece to the entire blouse doesn’t look too realistic. A blouse isn’t made out of a single piece of fabric. If your subject is wearing a tee-shirt the work will be easier but you still have a front, collar and two sleeves, and each should be treated independently.
Repeat Steps 7 & 8 for every section of the blouse. Choose different crops of the pattern and rotate them if necessary. The more you vary the use of the pattern, the more real the final picture will look.
Here are the layers created for my self portrait.

Step 10
Apply the displace filter again to the original illustration layer for your background. I also applied a canvasCanvas is the entire work area of a document. Think of it as the top of your office desk. More textureTexture in graphic design describes the surface quality of a design. Texture creates a 3D illusion. More to my background. Go to menu Filter Gallery>Texture>Texturizer>Canvas. Adjust the light and depth to suit your taste.
Step 11
Add a layer mask to the original portrait layer. Place the texturized background layer under the original portait layer. Add a slight drop shadow to the portrait layer. Collect all of the blouse layers into a folder so your layers are organized.

Step 12
Our picture is almost there; we still need to add some highlights and shadows back into the blouse for a realistic appearance. Select the original portrait layer and duplicate it. Remove the drop shadow layer effect. Convert the new layer to grayscale. Press Command-U (PC: Cntrl-U) to bring up the HueHue is how a color is perceived to be red, yellow, green, blue, purple, etc. The attribute of color ... More SaturationThe purity of a color. Zero amount of saturation equals gray. Equal numbers of r,g,b equal gray. More dialog. Take the saturation slider all the way to the left. Click “okay.” Press Command-L (PC: Cntrl-L) to bring up the Levels dialog box. Slide the right- most arrow to the left until you get lots of completely white areas in the image. Click “okay.” Move this layer to the top-most priority, and set the blend modeBlend Modes control how colors interact with each other. Blend Modes can be applied to layers and br... More to “multiply.’ Create a layer mask that removes everything but areas with the pattern.
Click the original portrait layer and duplicate it again. Follow the same steps but this time use the levels to create a much darker and contrasted grayscale image. See sample below. Move this layer to the top priority and set the blending mode to overlay. Create a layer mask for the blouse only.
You may have to play with the levels controls on both of these layers to get the shape and contrast that works for your image. Adjustment layers are great for this kind of creative control. I recommend using them if you know how.
Here is the finished image and the layers used to create it.

Good luck and have fun creating your own.